
Have you seen someone’s face light up when they find a simple solution to a complex problem? Our team has helped hundreds of lifecycle marketers have their little “aha” moments by teaching them this method.
It’s time for you to have yours.
Most product marketers face the same challenges with building automation workflows:
- There’s so much advanced stuff you want to build, but you don’t know where to start
- You designed your workflows in Miro or Figma, but ended up with a Frankenstein of branches and condition checks
- You planned a big list of small workflows which are hard to manage (“what if they all trigger at the same time?”)
- It’s not clear which product features your customers will use first
- It’s not clear at which level to customize your workflows: create branches, use Liquid, or create separate workflows?
- You’re struggling to come up with behavior-based triggers for new workflows
- It’s particularly hard to come up with triggers when the user doesn’t do anything, but you want to nudge them
The step-by-step method below looks simple and natural (which is great). It’s like “please break your eggs before frying them.” But it does reliably prevent you from getting buried in condition logic.
Thanks to Alan Harris of Arcade for doing an expert review of this article.
Don’t wait for the muse. Apply this step-by-step method to write high-performing email campaigns in hours, not weeks.
What’s the method about? 60-sec recap
This step-by-step method helps you build complex behavior-based workflows from scratch.
Here are the steps:
- Start with a behavior trigger
- Build a simple workflow for when the user does nothing — this gives you a “baseline” time-based workflow
- Add an exit condition (optional) — this helps you avoid checking for the same condition every time
- Add condition checks for feature usage — this allows you to skip on irrelevant emails
- Customize the user journey with behavior logic — add branches and advanced logic nodes to your workflow
- Keep expanding your workflow — try to add new emails to existing workflows, instead of creating multiple small workflows (they overlap and get messy fast)
- Optimize — use A/B/C testing and conversion goals to measure performance
Keep reading for step-by-step instructions and example charts.
How we came up with this
In January 2024, we started offering free roadmapping calls to every new Userlist customer. It’s a live 60-minute consulting session where we help companies plan their data, segments, and workflows, while accounting for all the complexity of their unique SaaS business. They walk away with a roadmap document — their custom data tracking and segmentation plan.
During these calls, we’ve heard a lot of stories. We’ve helped troubleshoot a lot of problems. And we’ve seen marketers have their own “aha moments”, specifically regarding workflow logic.
So we decided to extract this knowledge into this guide.
Bigger picture
Workflow planning is a part of the bigger SaaS email marketing implementation process:
- Integration. You create a data-tracking plan and pass it over to your engineering team, so that customer data starts flowing into Userlist.
- Segmentation. Map your customer journey and set up your segments for each lifecycle stage. E.g. Trials, Paying Customers, etc.
- Planning your workflows (you’re here).
- Writing email content. We have a method for this called Atomic Emails.
- Assembling everything and launching your workflows.
- Optimization. A/B testing, measuring conversion goals.
Step 1. Start with a behavior trigger
A workflow trigger is a specific “change in the world” which starts a workflow. In SaaS lifecycle marketing, triggers often correlate with a new lifecycle stage:
- User starts trial (e.g. joins segment Trials)
- User converts to a paying customer (e.g. joins segment Paying Customers)
For classic cases like user onboarding, choosing a trigger isn’t hard. Read this guide on behavior triggers to learn more.
Todo. Create a trigger that starts your workflow.

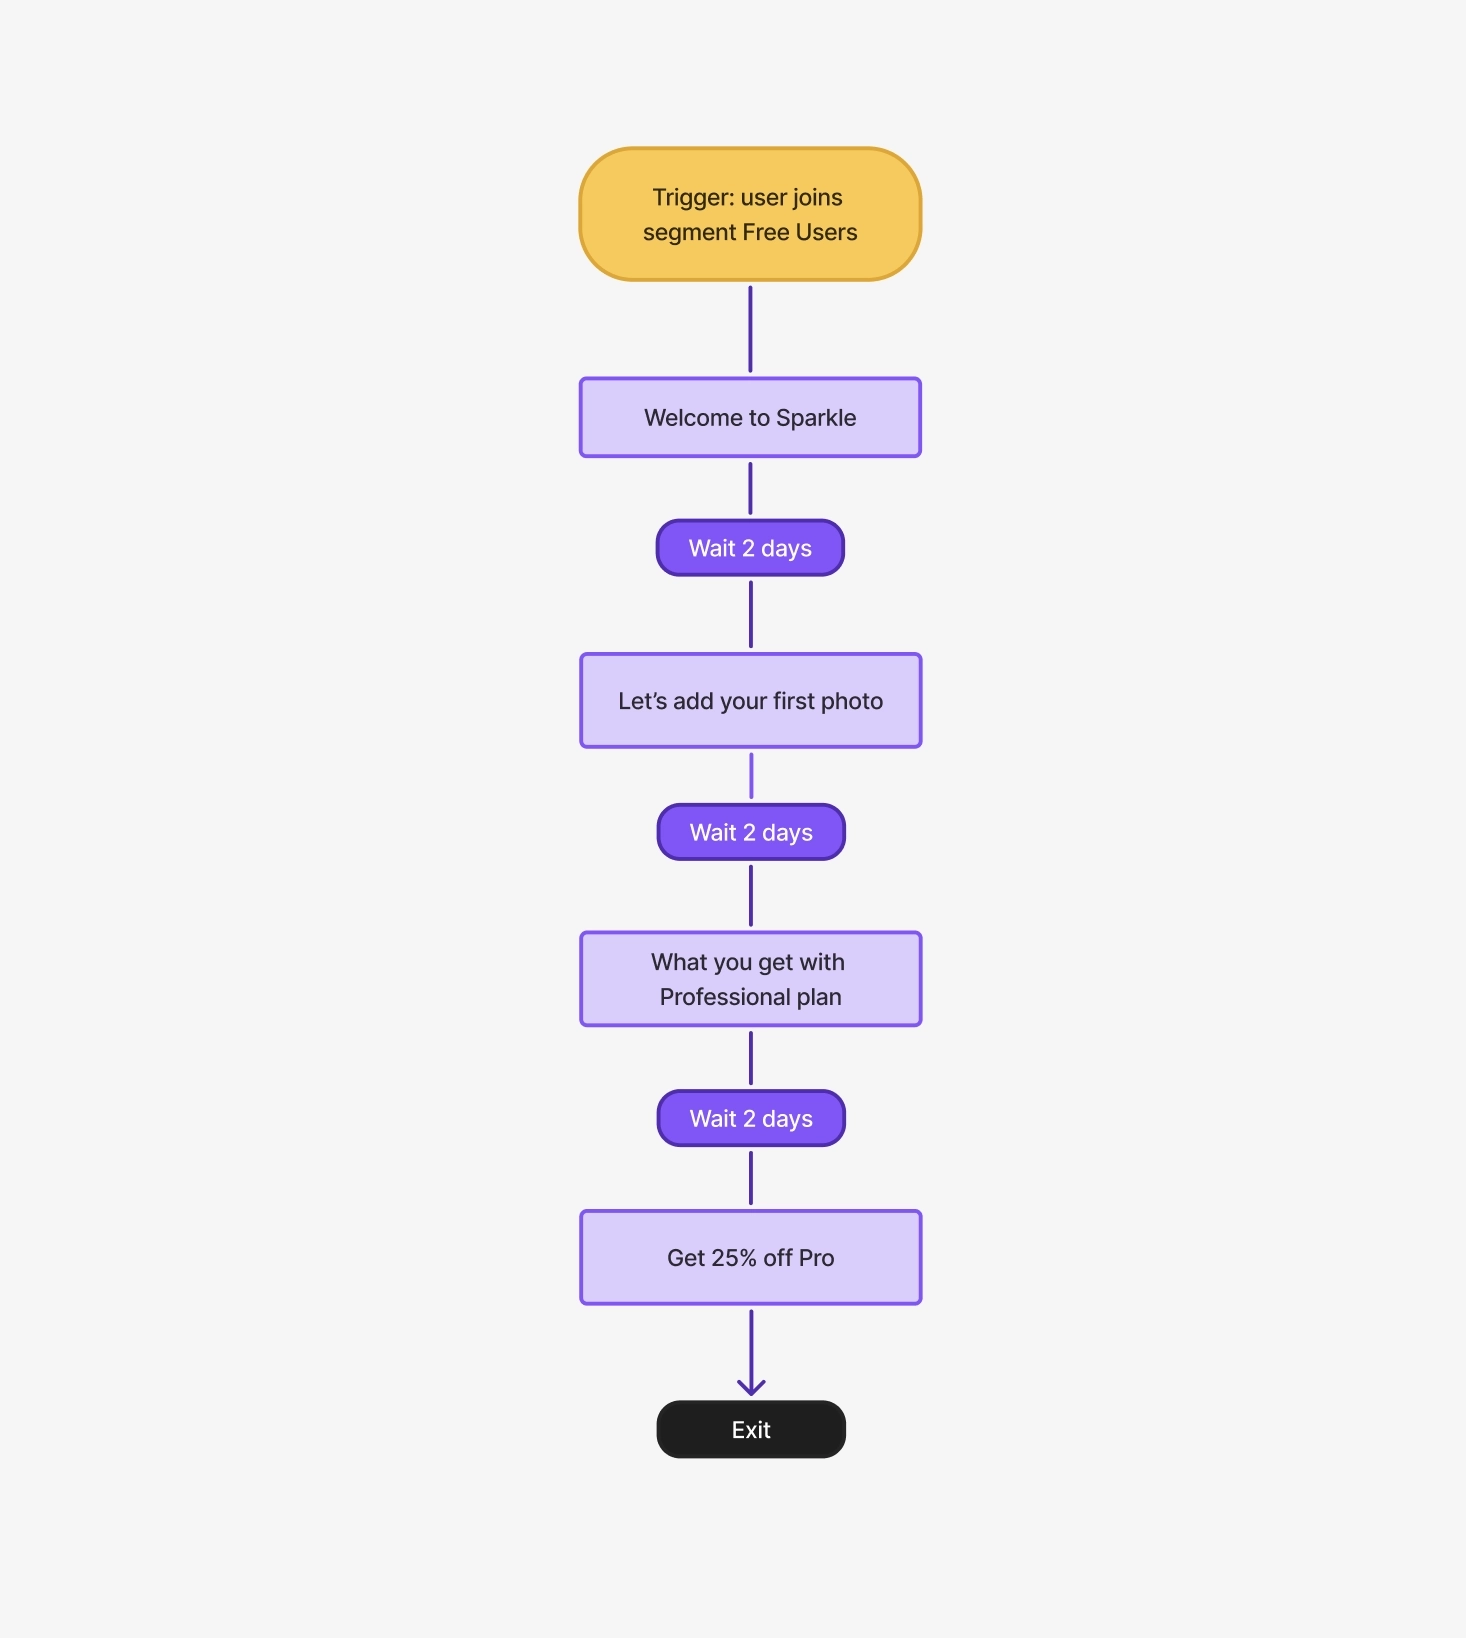
Step 2. Build a simple workflow for when the user does nothing
When the user does nothing (which happens a lot with new trials or free users), you should have a clear, time-based plan for emailing them. Yes, that means that every sexy behavior workflow is based on an unsexy drip campaign.
Also, Gall’s law: any complex system can only be created by improving an existing simple system.
Todo. Build a simple time-based flow for when your user does nothing.
Step 3. Add an exit condition (optional)
Many SaaS workflows have one big conversion event in mind. Once that target is achieved, the user needs to exit this workflow because the rest of the emails are not necessary. Oftentimes, this same event is a trigger for another workflow, starting the next lifecycle stage.
For example, an Upgrade to Paid workflow converts freemium users into paying customers and includes 12 emails spaced 7 days apart. If the user upgrades (e.g. joins the segment Paying Customers) they need to exit.
A common mistake is checking “Have they converted yet?” after each email. This is not optimal, and you’ll end up with an unwieldy tree of condition checks.
A much better solution is to use a smart “overarching” exit condition that pulls the user out at any stage. You only need to set such exit condition once.
Todo. If applicable, add an exit condition to your workflow.
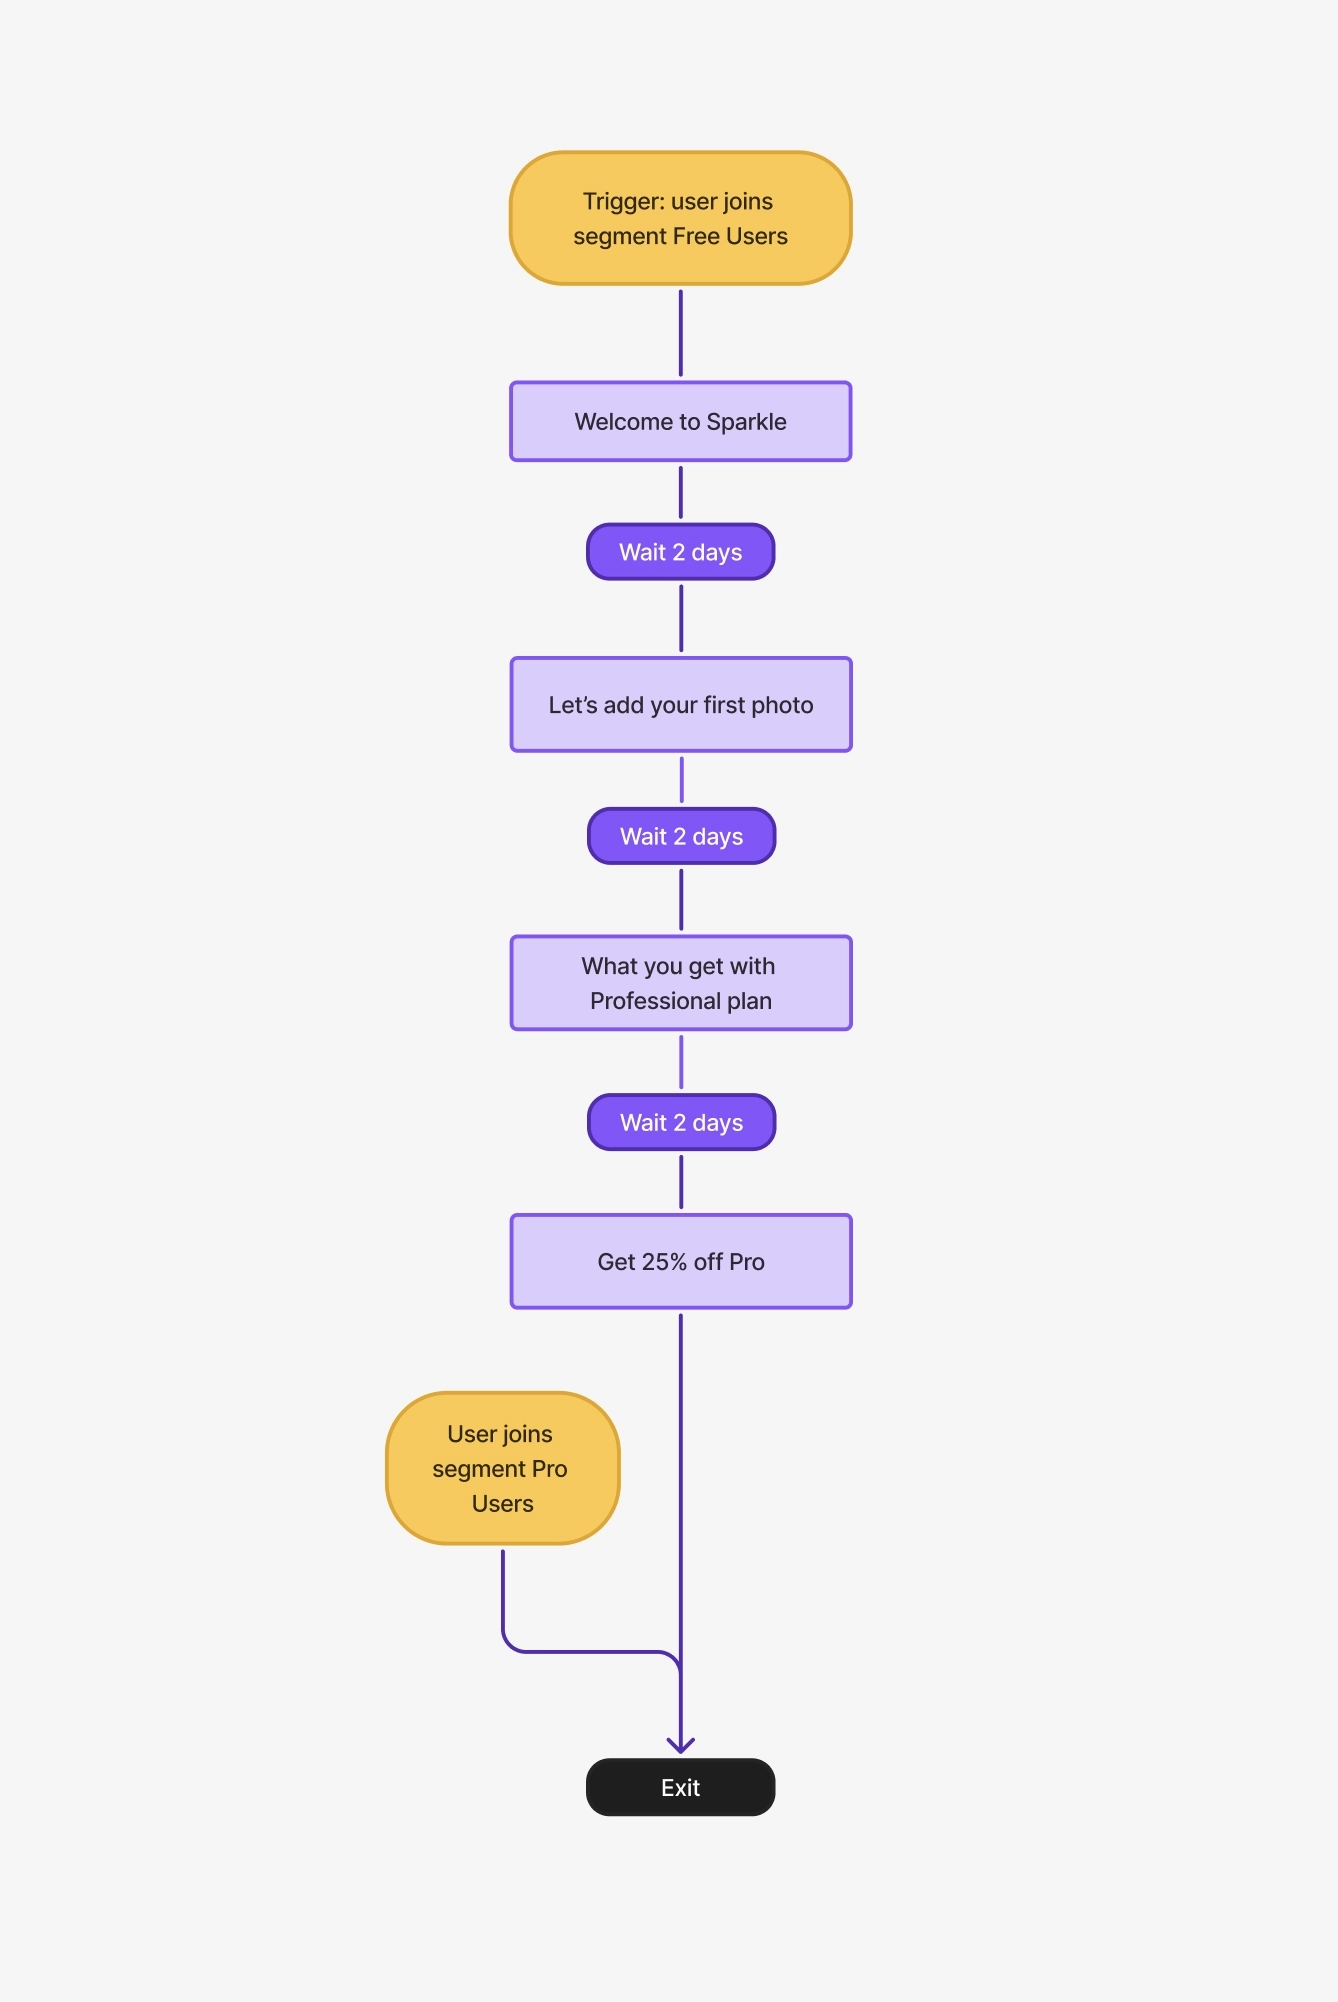
In Userlist, you can add an exit condition by placing a Teleport node at the end of this campaign. The Teleport node pulls the users from anywhere above in the workflow into this node.
Don’t wait for the muse. Apply this step-by-step method to write high-performing email campaigns in hours, not weeks.
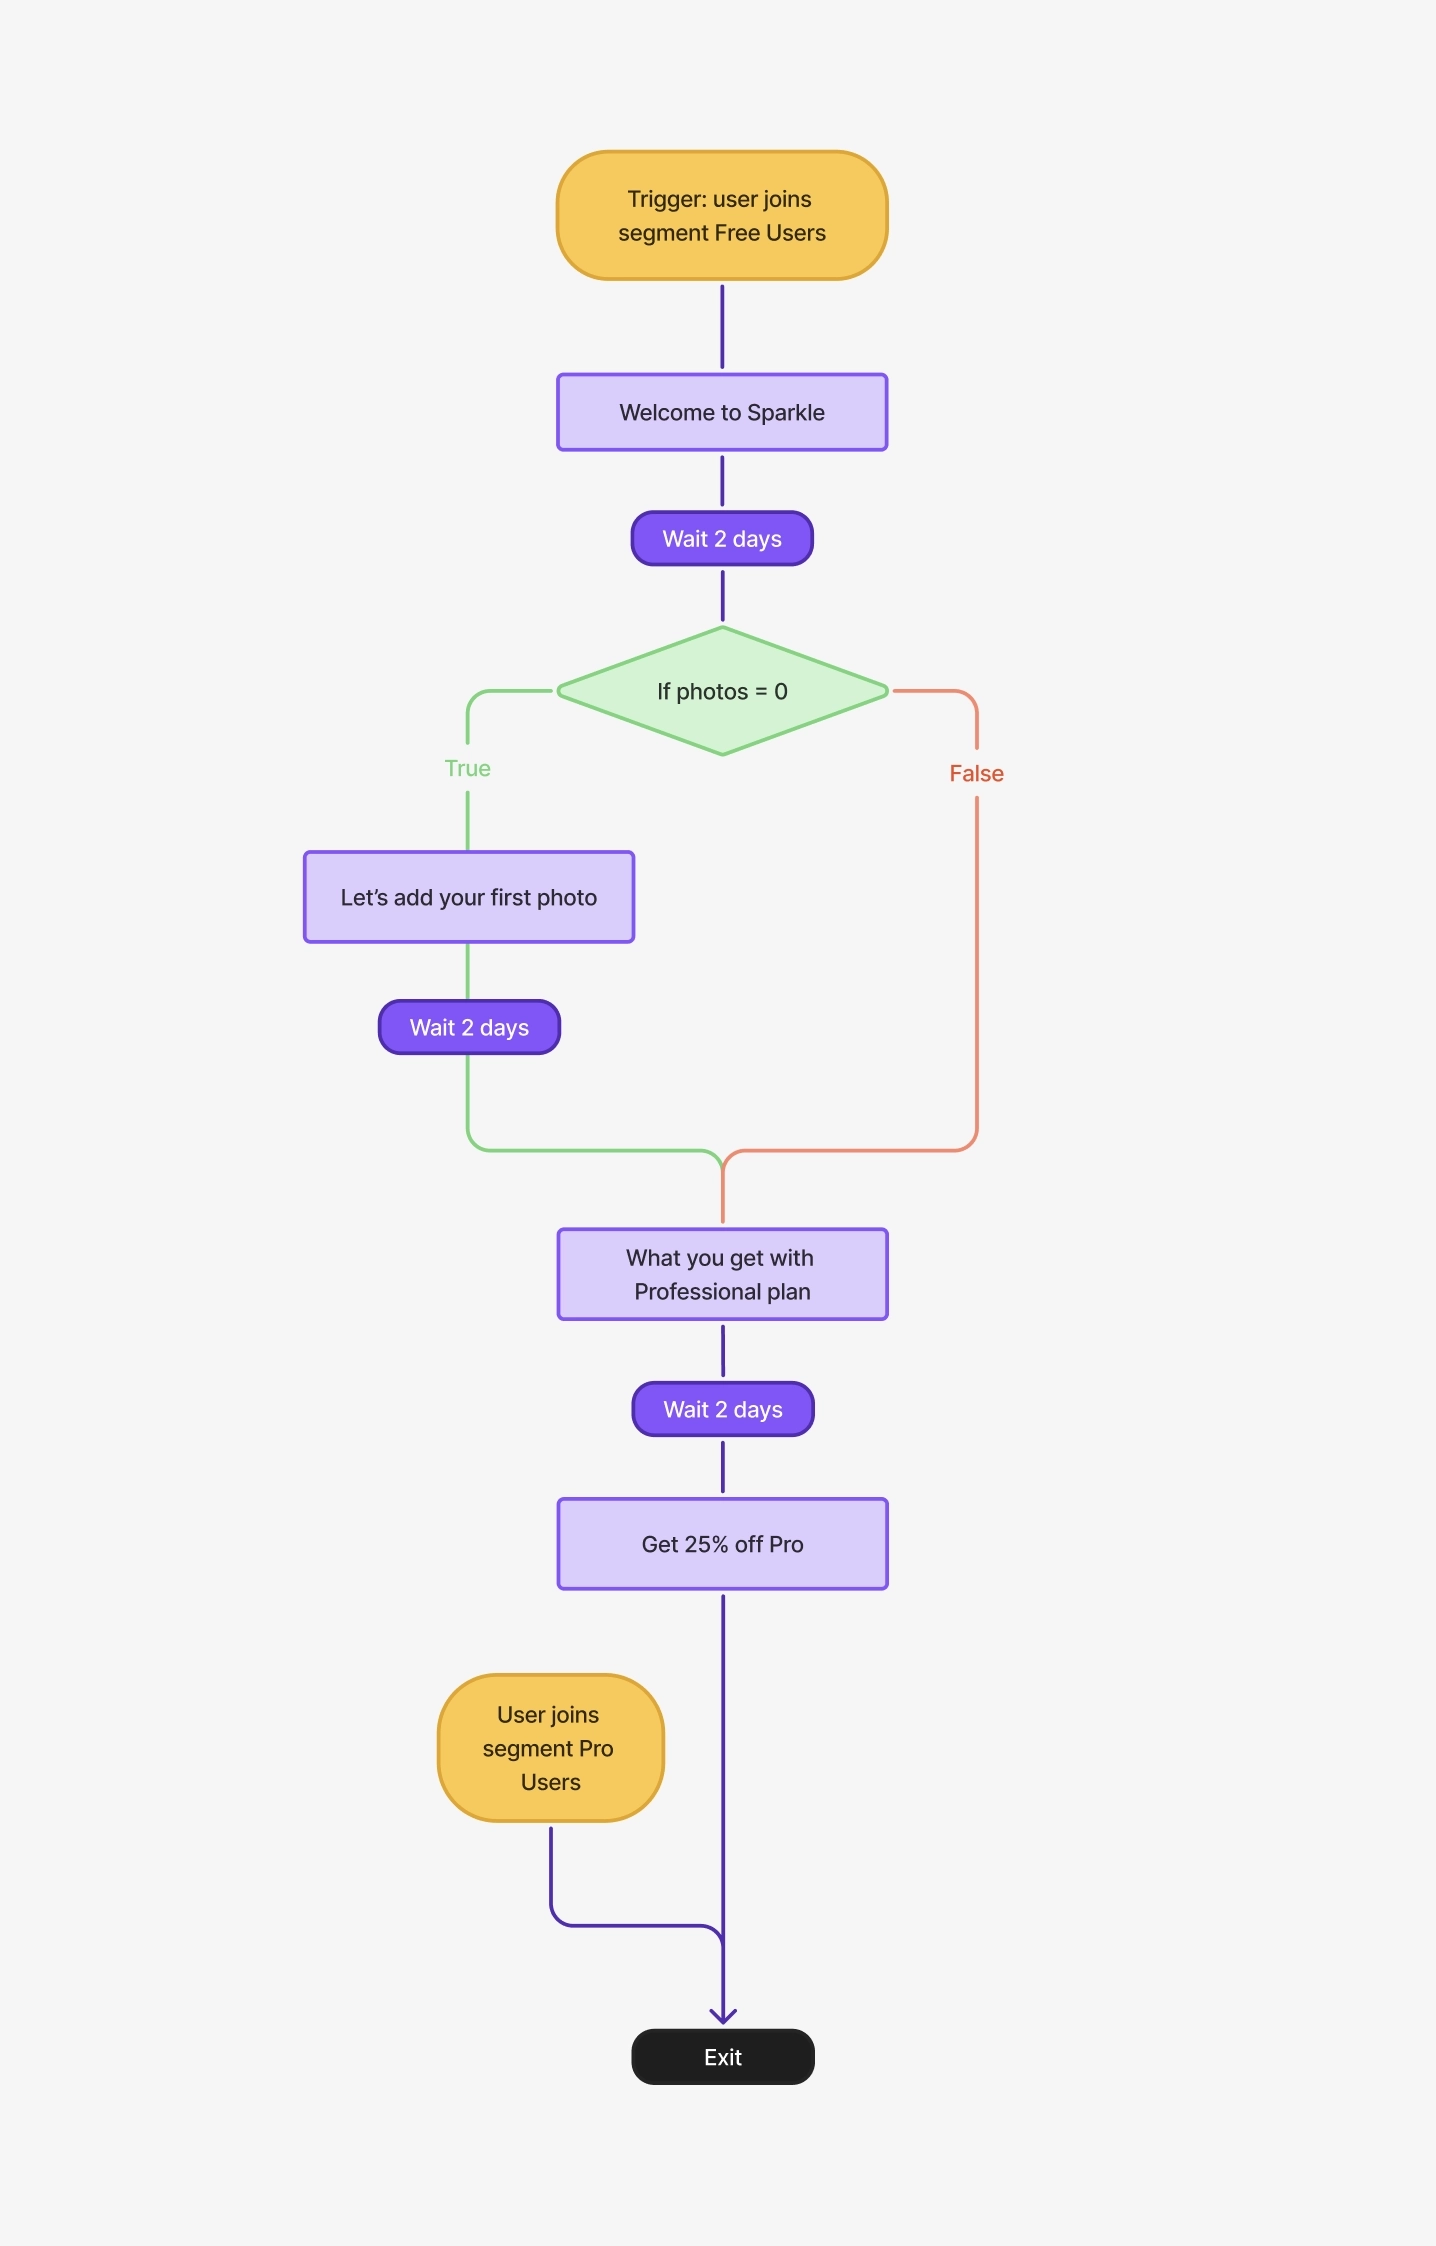
Step 4. Add condition checks for feature usage
Now that you have a simple “worst case” journey, let’s exclude feature emails in case the user has already started using those features.
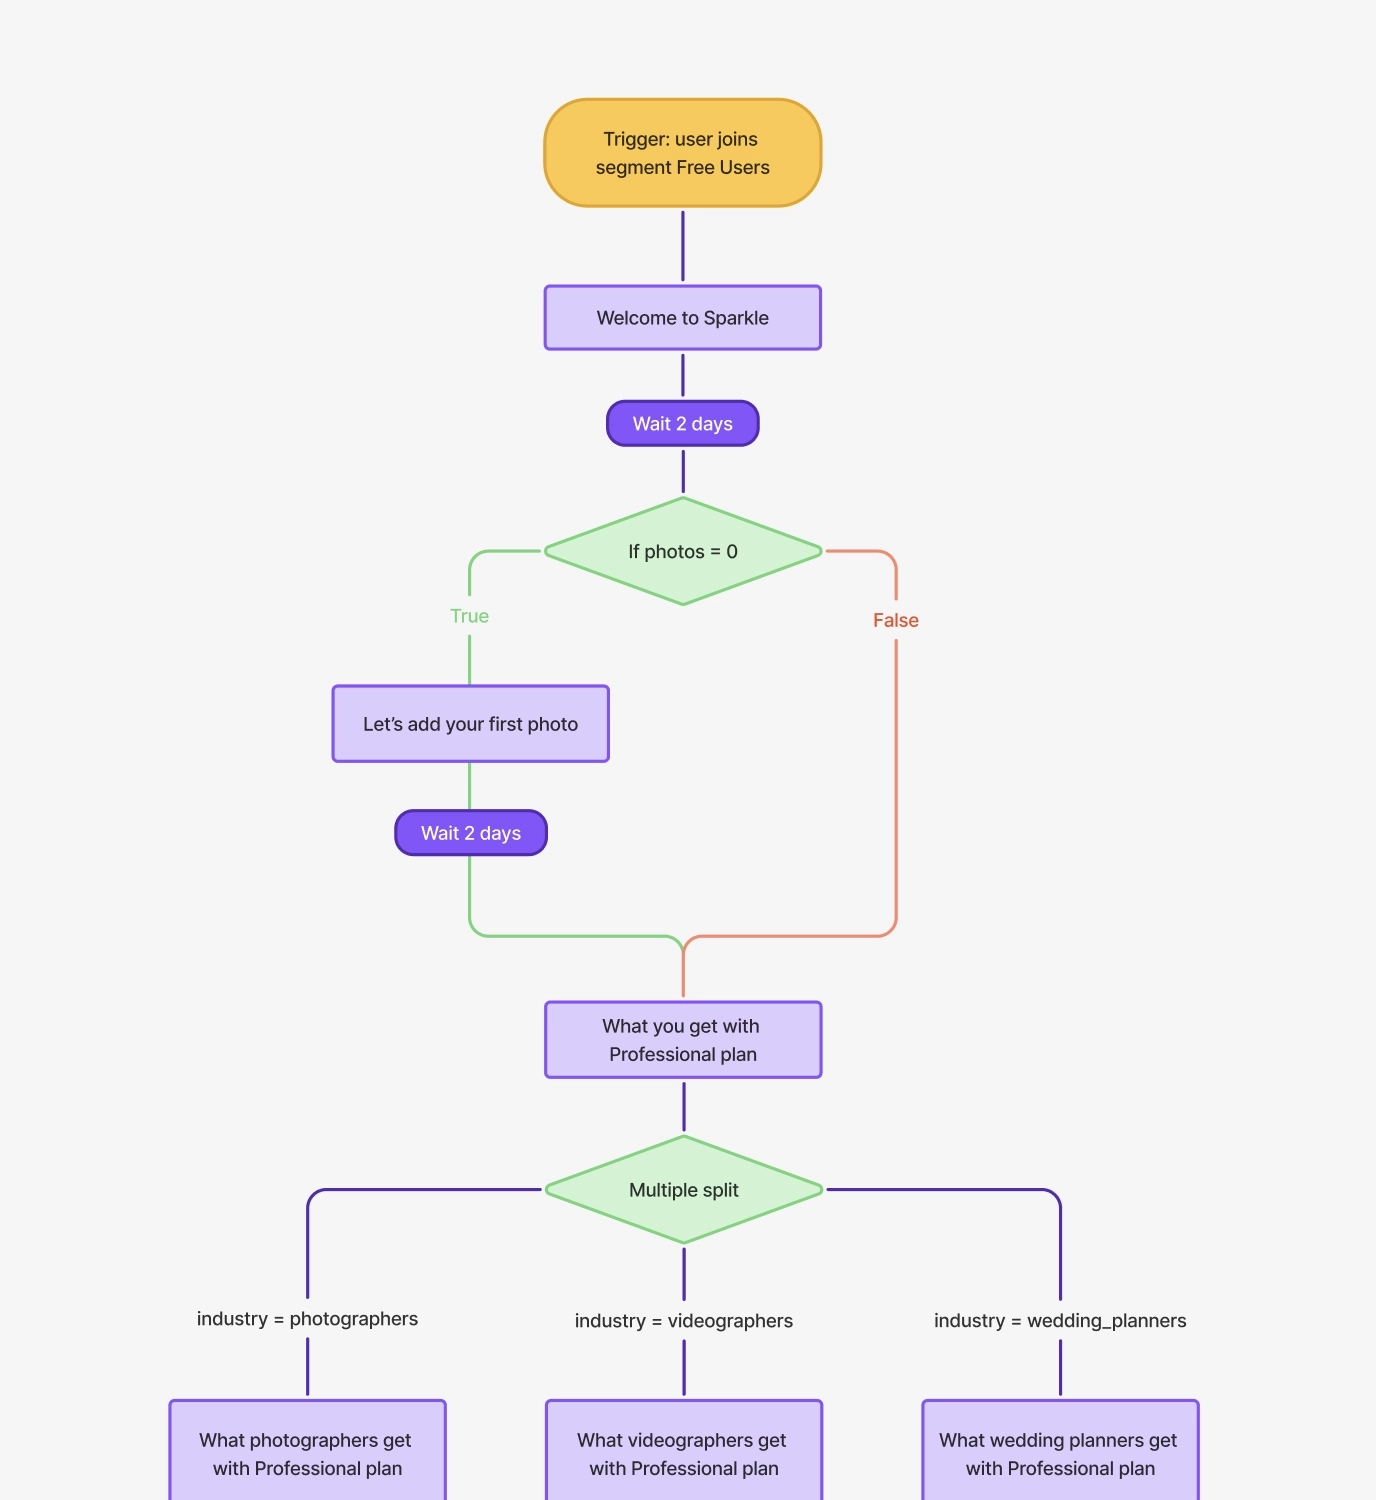
To do that, place condition checks using behavior data (such as the current number of photos in their account). In the example below, we’re checking if the user has started using the photos yet, and nudging them only if photos = 0.
You can also use events for these condition checks, e.g. user performed event photo_added at least 1 time.
Todo. Add condition checks to exclude irrelevant emails.
Step 5. Customize the user journey with behavior logic
Now you can power up your workflow with other logic operators and branches. Specifically, you can:
- Create branches for different roles or industries
- Add Wait Until nodes if your product has different activation stages
- Add Repeat Until cycles
- Add Production Systems
- Add other channels such as in-app messages and internal notifications to your team
In the example below, we’re creating three branches for different industries to customize their upgrade benefits.
Todo. Customize your workflow by adding conditions and branches.
Step 6. Keep expanding your workflow
Imagine you’re introducing a referral program, and want to add this email to your lifecycle marketing program. A common mistake is to create a new workflow.
If you do this, you’ll face multiple challenges. When exactly shall we send this email? How do we make sure it doesn’t overlap with other lifecycle emails?
Instead of creating a new workflow, look for an existing workflow addressing the same lifecycle stage. E.g. that referral email should be sent to paying customers. Do you already have a workflow for these folks? Most likely, you do. Then just go ahead and add the referral email to it.
P.S. This recommendation collected mixed reviews from several experts. So please use your own judgement.
Our guest expert Alan Harris says:
“This is actually debatable. Agree, they can overlap and get messy fast. But having a single, extremely complex workflow with dozens of conditional branching paths can also get visually overwhelming and hard to manage, for both the person creating/managing the workflow and teammates trying to visually parse what is going on. I’m not saying one option is superior to the other, just that there are pros and cons to both.”
Step 7. Optimize
If you have a sufficient volume of users, you’ll be interested in measuring your workflow performance at scale, and A/B/C testing different approaches.
Read more on the topic:
Sanity checks
Your workflow should be clean and straightforward. If you find yourself buried in conditions, something can be improved.
Here are some warning signs and sanity checks:
- If you find yourself typing the same content multiple times, consider improving your logic or using a Snippet
- If you’re checking for the same condition over and over, consider using a Teleport instead
- If you can’t figure out the trigger, consider plugging this email into a bigger workflow that already exists (like user onboarding or customer success campaign)
Let’s build some awesome workflows
Now that you know the theory, it’s time to put this in practice. Automation doesn’t have to be complex; it just needs to match your business goals.
Check out other fundamental guides from our team:
- Atomic Emails: Our Proven Method for Writing Email Campaigns
- SaaS Email Marketing Strategy: Everything You Need to Know
- One Email List, Multiple Products: How to Orchestrate Your Campaigns
- How to Trigger a Behavior-based Email Campaign: 6 Good & Bad Ways
- The Ultimate Guide to Customer Segmentation for SaaS
Don’t miss out on new articles. Subscribe to our newsletter and get your monthly dose of SaaS email marketing insights.